Please continue to review Lessons 1-4 (below in reverse order).
Today we start using our new skills for Online Searching:
LESSON 5 - Using the LAPL Catalog
1. How to Find the Catalog
*From the Los Angeles Public Library homepage
*Click on Go to the Catalog for more options
2. How to Search
*Type in your search terms
*Select the Search Type from the drop-down menu
*Click "Search"
3. Search Types:
*Keyword: the word appears anywhere in the record
*Title Browse: if you know the exact title, including punctuation.
(Do not use beginning articles such as "a", "an", or "the".)
*Author: when you know the name of a certain author. You can type the author's name in any order.
4. Results List:
You will then see a list of titles.
* Click on the blue, underlined title for more information.
*Scroll down to see a list of libraries where the item may be found.
*Click on the blue, underlined Library Name (Agency) for more information about the owning Library.
5. Item Information:
AVAILABILITY:
CIRC=Circulating (can be checked out)
REF=Reference (for use in the Library only.)
CALL NUMBER: indicates where in the Library the item may be found.
STATUS:
Not Checked Out: the item should be in the library.
Checked Out: the item is not on the shelf at this time.
(You may be able to place a hold on the item.)
* * * * *
1/12/2007
12/28/2006
Lesson 4 - The Bar Scene
In this lesson, we will become familiar with some of the standard elements of Internet and MSN format.
LESSON 4 - INTRODUCING YOU TO BARS (click to view)
BARS legend:
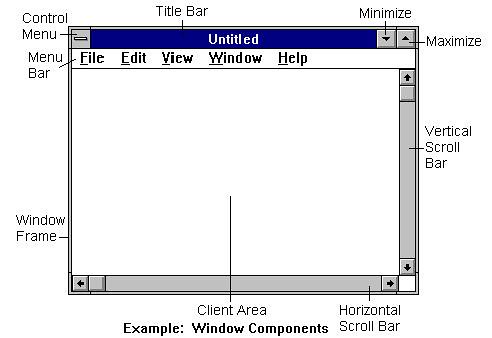
*Control Icon: Opens a Windows-related menu with a click.
*Title Bar: Shows the window title and 3 standard control buttons:
1) Minimize button: Hides the window from view but it remains as a button on the task bar.
2) Maximize/Restore button: Maximizes (opens) a window so that it covers the whole desktop or restores a maximized window to its original size.
3) X (close) button: Closes the window.
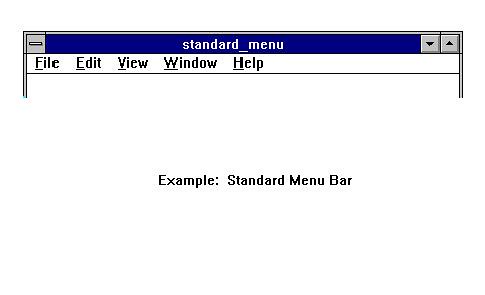
*Menu Bar: these drop-down menus provide software instructions. By clicking any word on a menu bar, the corresponding list opens.
*Standard Operating System Menu Bar: while in an application window, you can access the instructions for that specific software.
*Scroll Bar: Appears when there are more contents of the page than fit in the window. There are vertical and horizontal scroll bars.
 Creates a new document
 Opens an existing document
 Saves the open document
 Prints the open document
 Shows the print preview
 Searches for text
 Cuts selected text
 Copies selected text
 Pastes texts
 Undoes the last action
 Inserts Date and Time
 Applies Bold typeface to selected text
 Applies Italic typeface to selected text
 Underlines selected text
 Applies a selected color to selected text
 Aligns the paragraph to the left
 Centers the paragraph
 Aligns the paragraph to the right
 Adds bullets
* * * * *
LESSON 4 - INTRODUCING YOU TO BARS (click to view)
BARS legend:
*Control Icon: Opens a Windows-related menu with a click.
*Title Bar: Shows the window title and 3 standard control buttons:
1) Minimize button: Hides the window from view but it remains as a button on the task bar.
2) Maximize/Restore button: Maximizes (opens) a window so that it covers the whole desktop or restores a maximized window to its original size.
3) X (close) button: Closes the window.
*Menu Bar: these drop-down menus provide software instructions. By clicking any word on a menu bar, the corresponding list opens.
*Standard Operating System Menu Bar: while in an application window, you can access the instructions for that specific software.
*Scroll Bar: Appears when there are more contents of the page than fit in the window. There are vertical and horizontal scroll bars.
*Window Corner: From these three little lines, you can change the window size by clicking and dragging to the desired shape and size. Note that the window corner shows only if the window is minimized. It does not appear when the window is maximized.
*Status Bar: This bar provides information about the window contents or about the action you are performing. It's good practice to check the information shown there.
===========
----------------
-------------
1. The Title Bar
The Title Bar is what you see at the top of your screen. It identifies the name of the file you are viewing and the name of the program you are using to open that file.
2. The Menu Bar
The Menu Bar is directly below the Title Bar. It is called the Menu Bar because it has buttons that allow you to access available options. These menus have names like File, Edit, View, Help, etc., depending on the MSN program you are using.
3. The Standard Toolbar (MSN)
In Microsoft Word and other Office programs, the Standard Toolbar is the one immediately below the Menu Bar, consisting of icons for basic commands, such as Print, Save, Back, Forward, etc.
4. The Formatting Toolbar (MSN)
Many Microsoft programs allow you to format text or graphics. These programs include another toolbar which gives you access to the most common commands to use for this purpose. If the program you are using allows you to format text, the Formatting Toolbar will include a dropdown list where you can select your font type, font size, etc.
5. The Address Bar
The Address Bar is located directly above the webpage, the lowest of the Toolbars. It is the part of the Internet/Web Browser that indicates the URL* of the webpage currently being viewed. It is less frequently called the URL bar or Location Bar. A new webpage can be viewed by typing its URL into the Address Bar. (*URL = the Universal [or Uniform] Resource Locator, in other words: the Internet/World Wide Web [www] address.)
6. The Status Bar
Many programs include a Status Bar at the bottom of your window, which gives you some statistics about the file you are viewing.
7. The Windows Taskbar
This is a bar that is often misnamed. It is not a toolbar. It is the Taskbar that holds buttons and previews for current programs that you have open. It is on the very bottom of the screen and includes (looking from the left to the right): the Start Button, Quick Launch Toolbar, Open Application buttons, and the Notification Area (a.k.a. the System Tray: Clock, Date, and Icons.)
The Title Bar is what you see at the top of your screen. It identifies the name of the file you are viewing and the name of the program you are using to open that file.
2. The Menu Bar
The Menu Bar is directly below the Title Bar. It is called the Menu Bar because it has buttons that allow you to access available options. These menus have names like File, Edit, View, Help, etc., depending on the MSN program you are using.
3. The Standard Toolbar (MSN)
In Microsoft Word and other Office programs, the Standard Toolbar is the one immediately below the Menu Bar, consisting of icons for basic commands, such as Print, Save, Back, Forward, etc.
4. The Formatting Toolbar (MSN)
Many Microsoft programs allow you to format text or graphics. These programs include another toolbar which gives you access to the most common commands to use for this purpose. If the program you are using allows you to format text, the Formatting Toolbar will include a dropdown list where you can select your font type, font size, etc.
5. The Address Bar
The Address Bar is located directly above the webpage, the lowest of the Toolbars. It is the part of the Internet/Web Browser that indicates the URL* of the webpage currently being viewed. It is less frequently called the URL bar or Location Bar. A new webpage can be viewed by typing its URL into the Address Bar. (*URL = the Universal [or Uniform] Resource Locator, in other words: the Internet/World Wide Web [www] address.)
6. The Status Bar
Many programs include a Status Bar at the bottom of your window, which gives you some statistics about the file you are viewing.
7. The Windows Taskbar
This is a bar that is often misnamed. It is not a toolbar. It is the Taskbar that holds buttons and previews for current programs that you have open. It is on the very bottom of the screen and includes (looking from the left to the right): the Start Button, Quick Launch Toolbar, Open Application buttons, and the Notification Area (a.k.a. the System Tray: Clock, Date, and Icons.)
=========
Some Common Toolbar Icons:
 Creates a new document
  Opens an existing document
  Saves the open document
  Prints the open document
  Shows the print preview
  Searches for text
  Cuts selected text
  Copies selected text
  Pastes texts
  Undoes the last action
  Inserts Date and Time
 Applies Bold typeface to selected text
 Applies Italic typeface to selected text
  Underlines selected text
  Applies a selected color to selected text
  Aligns the paragraph to the left
  Centers the paragraph
 Aligns the paragraph to the right
  Adds bullets
 12/14/2006
Lesson 3 - Computer Comfort
LESSON 3: COMPUTER COMFORT
1. Computer Basics: Input and Output Devices (Monitor vs. Mouse)
2. Computer Skills: Put the Alphabet in Order
3. Computer Basics: Keyboard Keys
4. Computer Skills: Take a Trip
* * * * *
12/02/2006
Lesson 2 - Hardware vs. Software
Now that you've completed the Mouse Exercises in Lesson One, let's continue with new computer skills. (You can go back to Lesson One at any time to review and refresh your skills.)
LESSON 2: HARDWARE and SOFTWARE
1. Hardware = the parts of the computer that you can see and touch.
*Screen
*Monitor
*Mouse
*Keyboard
*CPU
*Speakers
Also:
*Hard Drive (C:)
*Floppy Disk Drive (A:)
*CD Drive (D:)
*RAM (Memory)
2. Software = the Operating System (OS) and Programs that are on your computer. There are also special software programs being developed for Web 2.0. See some examples here.
The OS of the computer you are using is ____________ Software.
*Click here to see a Hardware vs. Software Computer Cartoon!
* * * * *
LESSON 2: HARDWARE and SOFTWARE
1. Hardware = the parts of the computer that you can see and touch.
*Screen
*Monitor
*Mouse
*Keyboard
*CPU
*Speakers
Also:
*Hard Drive (C:)
*Floppy Disk Drive (A:)
*CD Drive (D:)
*RAM (Memory)
2. Software = the Operating System (OS) and Programs that are on your computer. There are also special software programs being developed for Web 2.0. See some examples here.
The OS of the computer you are using is ____________ Software.
*Click here to see a Hardware vs. Software Computer Cartoon!
* * * * *
11/29/2006
Lesson 1 - The Mouse
1. Mousing Around
Introduction to the Computer Mouse Basics.
2. Mouserobics
Practice precision using the mouse and learn some computer
More Mouse Practice
Four new tutorials to give you practice placing the mouse and clicking the mouse. Also learn to "drag and drop" and to draw with the mouse.
3. CHECKBOXES
Check your reflexes by checking boxes online. Try to improve your score!
4. BUZZY REFLEX
Another fun game to improve your mouse skills. Click to catch the flashing light. Don't get frustrated... keep trying!
5. TYPING TEST
A real-time typing test that gives your score on the spot. Fun and educational.
6. MOUSE PRACTICE GAMES
Some old familiar games with a new online look.
7. EN ESPAÑOL: Presione aquí para empezar.
* * * * *
Subscribe to:
Posts (Atom)